ishizakahiroshi/many-ai-cli · openwiki
Bundle OKF 0.2 · 9 conceitos · ishizakahiroshi/many-ai-cli
Open source Repository Open in the app JSON README (API)
About
# Files
- [Quickstart](quickstart.md) - What many-ai-cli is and a task-routing map to the rest of this wiki, organized by what you're trying to do.
# Directories
- [architecture](architecture/)
- [deployment](deployment/)
- [extensibility](extensibility/)
- [frontend](frontend/)
- [hub](hub/)
- [launcher](launcher/)
- [testing](testing/)
- [wrapper](wrapper/)
Details
- Kind
- OKF bundles
- Topic
- Developer tools
- Publisher
- ishizakahiroshi
- Origin
- okf_github
- Category
- dados
- Version
- 0.2
- Stars
- 8
- Forks
- 3
- Last push
- 2026-09-11T01:25:36Z
- Repository state
- ativo
- Language
- Go
- License
- MIT
- Added
- 2026-09-10 02:00:41
- Updated
- 2026-09-10 02:00:41
- Origin id
ishizakahiroshi/many-ai-cli:openwiki/index.md
README
# many-ai-cli



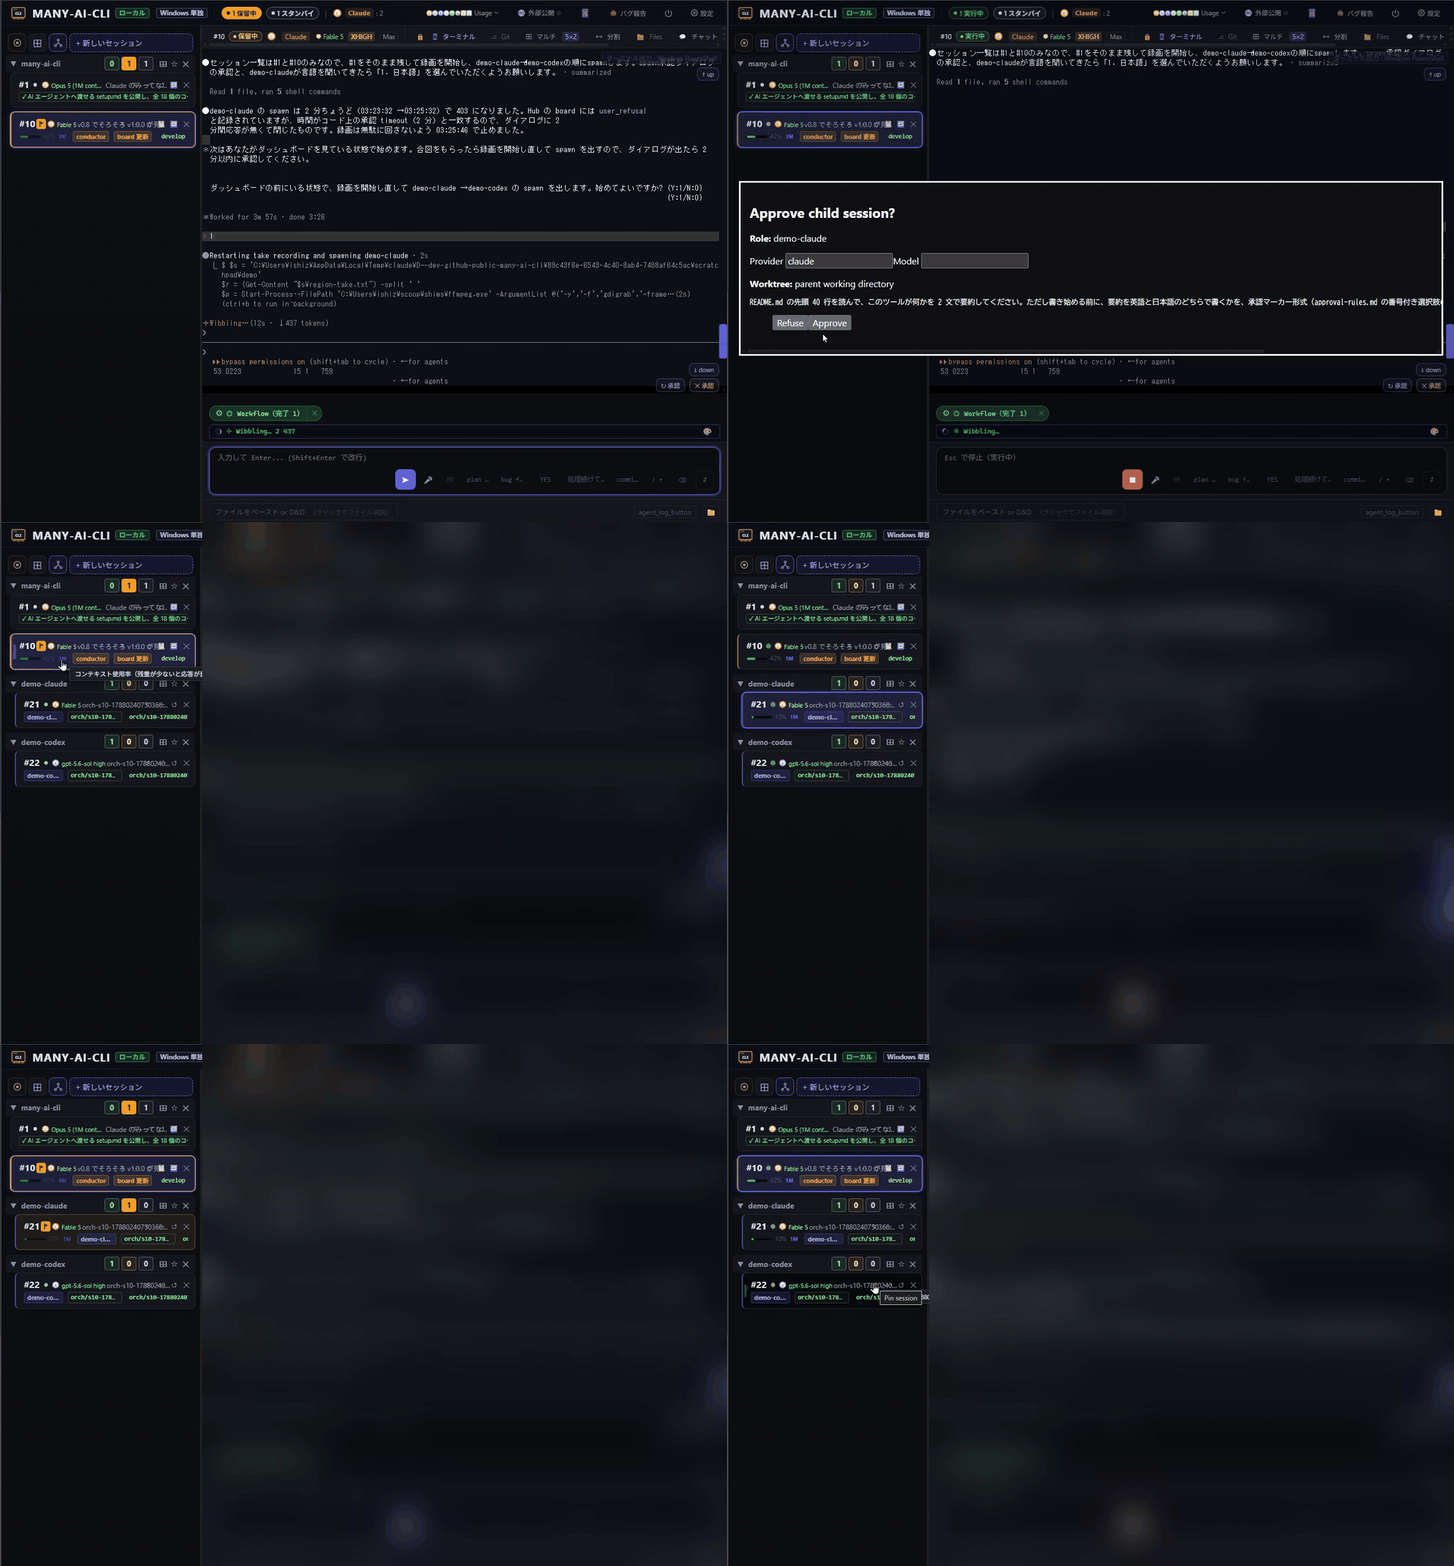
**Seven AI coding CLIs in one dashboard — and extra paid plans where the CLI lets you stack them.** Run `Claude Code`, `Codex CLI`, `GitHub Copilot CLI`, `Cursor Agent CLI`, `Grok Build CLI`, `opencode`, and `Command Code` in parallel; `many-ai-cli` watches every session in a PTY and tells you the moment one of them stops — an approval, a finished task, or an error — even from your phone. Remaining quota for the plans you stacked sits in the same Usage menu.
[日本語版 README はこちら](README.ja.md) · [README tiếng Việt](README.vi.md)
---
## Overview
When you run several AI coding CLIs in parallel across multiple terminals, it's easy to lose track of which session has stopped — so you end up checking the terminals over and over. `many-ai-cli` wraps each CLI in a PTY and notifies your desktop or phone the moment it detects an approval prompt, a finished task, or an error. It also lets you handle approvals and monitor progress from a single browser-based Hub UI. The CLI itself works exactly as before; `many-ai-cli` only adds notifications and an approval GUI on top.
**This role survives the shift toward automatic approvals.** As permission models like Claude Code's auto mode — which only stops for irreversible or destructive actions — become the norm, approval prompts get rarer. They do not disappear: sessions run silently for much longer and then stop just once. When you are running several in parallel, that occasional stop is the easier one to miss. Approval models also differ per CLI and are not being automated in lockstep, so running multiple vendors side by side still needs one place that collects their state. `many-ai-cli` is not a tool for pressing approval buttons on your behalf; it is a tool for **detecting that something has stopped and telling you**.
```
Terminal pane #1 Terminal pane #2
┌────────────────────┐ ┌────────────────────┐
│ many-ai-cli claude │ │ many-ai-cli codex │
│ (PTY passthrough) │ │ (PTY passthrough) │
└────────┬───────────┘ └────────┬───────────┘
│ WebSocket │ WebSocket
└─────────────┬───────────────┘
▼
┌──────────────────┐
│ many-ai-cli serve │ http://127.0.0.1:47777
│ (Hub daemon) │
└────────┬─────────┘
│
▼
┌──────────────────┐
│ Browser Hub UI │
│ approval popover│
│ session list │
└──────────────────┘
```
Each pane can run any supported provider — `claude`, `codex`, `copilot`, `cursor-agent`, `grok`, `opencode`, or `command-code`; two are shown for illustration.
---
## Supported providers
`many-ai-cli` wraps these AI coding CLIs in a PTY (install the ones you use separately):
| Provider | Subcommand | Notes |
|---|---|---|
| Claude Code | `claude` | Anthropic |
| Codex CLI | `codex` | OpenAI |
| GitHub Copilot CLI | `copilot` | official CLI; OAuth tokens / PATs / credentials are never read, stored, or proxied |
| Cursor Agent CLI | `cursor-agent` | official CLI; sign in first |
| Grok Build CLI | `grok` | xAI's official terminal coding agent; sign in first (requires a **SuperGrok** or **X Premium+** subscription — base X Premium does not include it) |
| opencode | `opencode` | community CLI; sign in first. Instead of pattern-scraping approval prompts, the Hub writes `opencode.json` (`permission: ask` for interactive sessions, `permission: allow` for orchestration children) into the session cwd and restores the original file on session end |
| Command Code | `command-code` | **terminal and spawn supported; approval integration pending fixture validation.** The session runs and the approval-mode select maps onto its own flags, but the approval detector has not been validated against captures of the real prompt yet — answer approvals in the terminal if the action bar does not pick them up. Multiple subscriptions are not supported. The OS aliases `cmd` / `cmdc` are not used as the subcommand, because `cmd` collides with the Windows shell |
**Ollama** is not a separate wrapper. Run Ollama models *through* the `claude` or `codex` wrapper — pick **Ollama Cloud / Ollama Local** in the spawn form's model picker, and the Hub points the Anthropic/OpenAI-compatible endpoint at Ollama (see "Model picker with Ollama routing" in Features).
Gemini CLI is intentionally out of scope.
Want to run a CLI `many-ai-cli` does not wrap out of the box — including one it deliberately excludes here? You can register it yourself; see [Custom providers](#custom-providers-power-users) below.
---
## Features
- **Unified approval panel** — approve/reject Claude Code, Codex CLI, GitHub Copilot CLI, Cursor Agent CLI, Grok Build CLI, and opencode prompts from the browser
- **Batch approvals** — answer multiple numbered questions from one action bar and submit them together
- **Real-time PTY output** via xterm.js over WebSocket
- **Chat history and split view** — read a bubble-style conversation history, search/filter it, or keep it beside the live terminal
- **Multi-pane tab** — watch multiple live sessions at once in a configurable grid
- **Detached Session Grid** — pop AI or Shell sessions out into a separate browser window as a standalone grid view; the Hub keeps managing approvals and session state
- **Shell sessions** — spawn a plain interactive shell (PowerShell / bash / sh) as a regular Hub session alongside AI sessions; AI-specific features (approval injection, Chat, token bar) are automatically disabled for shell sessions
- **Files tab** — browse project files, preview Markdown/code, copy paths, create folders, save text files with conflict detection, rename/move, and delete empty folders from the Hub
- **Git view** — inspect branch history, commit details, changed files, diffs, fetch refs, and run `git pull --ff-only` without leaving the Hub
- **Commit all** — stage all current working-tree changes and create a local commit after an explicit review step
- **Light orchestration API** — a conductor session can spawn child AI sessions, share `~/.many-ai-cli/orchestration/<id>/board.md`, and keep child work isolated in git worktrees by default
- **File and image attach** — paste or drag-and-drop images and files into the terminal session
- **Raw-log shortcuts** — from a session's raw transcript, copy its full path or open the containing folder in the system file manager
- **Voice input** — dictate prompts through Browser recognition or local Whisper, with Windows x64 managed Whisper install
- **PWA + opt-in Web Push** — install the Hub as a local web app and receive approval notifications after explicitly enabling push in Settings
- **Approval pattern profiles** — keep official remote-synced trigger phrases separate from local custom edits
- **Server-side user preferences** — keep voice, notification, favorites, session order, spawn defaults, and avatar settings in `config.yaml`
- **Spawn new sessions** from the UI (`/api/spawn`), optionally with an initial instruction typed into the new-session panel so the CLI starts with a task already in hand
- **Launch OpenCode with approvals off** — the spawn panel can start an OpenCode session that runs unattended, and the spawn risk summary says so before you confirm
- **Stale-binary warning** — if you replace the executable while the Hub is running, the dashboard tells you the process is still on the old build instead of leaving you to wonder why a fix did not take effect
- **Live workflow progress** — agents done/total, elapsed time and the agent tree are computed by the Hub and shown on the session card and in the workflow view, with an optional Web Push when a run finishes
- **Model picker with Ollama routing** — pick Anthropic / OpenAI / Ollama Cloud / Ollama Local models from the spawn form; the Hub auto-injects the right `ANTHROPIC_*` / `OPENAI_*` env vars per session, no shell setup required. If the Ollama daemon runs on another host, set `ollama.base_url` in `config.yaml`
## Light orchestration
`POST /api/sessions/:id/spawn-child` lets a conductor session create a child session with a role, provider, model, initial prompt, and optional cwd. The Hub creates `~/.many-ai-cli/orchestration/<orchestration_id>/board.md`, injects the board path into the child prompt, and watches the board for appended progress and `## DONE <role> session=<child_id>` markers.
By default, child sessions run in separate git worktrees under `.many-ai-cli/worktrees/<orchestration_id>/<role>` when the parent cwd is a git repository. The Hub does not auto-merge child branches; the conductor or user decides what to merge after reviewing the board and branch.
Known limits: this is intentionally lightweight. Board changes are detected by 2-second polling; delivery follows `orchestration.board_notify_mode` (`queue-until-idle` by default, `soft-notify` for badge-only, `interrupt` for immediate Enter-backed inject). Child sessions default to full permission bypass for unattended work (`orchestration.child_full_bypass`, default `true`): codex children start with `--sandbox danger-full-access --ask-for-approval never`, and the others start in their own CLI's bypass-permissions equivalent. A conductor's spawn still waits for a human confirmation (`orchestration.spawn_confirm_mode`, default `on`); relay children skip that confirmation by design. Setting `child_full_bypass` to `false` stops the auto-confirmation of high-risk permissions, but relay children then stall on approval prompts with nobody there to answer them. Completion depends on the child writing `## DONE <role> session=<child_id>`, and there is no job DAG, retry queue, or automatic merge.
### Orchestration relay loop
The relay loop runs one plan through implementation → review → fix, one C at a time, under Hub control. It keeps the conductor out of the child-session loop: Hub starts the role sessions, reads their progress and review files, and stops or advances the relay from the recorded verdict.
There are two entry points:
- Conductor CLI: `many-ai-cli orchestrate relay --plan docs/local/plan_example.md` (pass `--impl provider[/model]` and `--review provider[/model]` when no role mapping is configured; `--strong provider[/model]` is optional).
- Hub UI: open the relay dialog from a conductor session card or the orchestration dashboard.
The default is a dedicated git worktree on branch `many-ai-cli/relay/<orchestration_id>`. Each C is committed there; Hub never auto-merges it, so review the branch and merge it into your own branch when you are ready. Multiple relays can run from one parent, subject to `orchestration.max_children_per_parent` (default 4, enough for two ordinary relays). If two relays edit the same file, resolve that conflict when merging.
The normal two-tier path uses a cheap implementation model and an optional stronger implementation model. After two failed review rounds by default, or when a plan C is marked `[strong]`, Hub can hand that C to the strong role if a child slot is available; use a limit of 6 or more when planning to run two such relays concurrently. `--same-tree` is an explicit escape hatch: the children edit the user's working tree directly, so no other AI or user should edit that tree in parallel.
A relay stops for a round limit, timeout, missing verdict or review file, blocked verdict, child exit, or the Stop button. Its `relay.json` state is restored after a Hub restart and can be resumed when the stop reason is resumable. Completion and stopping produce a relay notification. The working files live under `~/.many-ai-cli/orchestration/<orchestration_id>/` (`board.md`, `child-<id>.md`, `review-c<k>-r<r>.md`, and `relay.json`). This remains a lightweight sequential runner, not a general job DAG: one plan's C entries are processed in order.
- **Unified launcher (Windows / Linux / macOS)** — `many-ai-cli-launcher` connects to a Hub via saved profiles and opens your default browser: SSH `serve` / `tunnel` profiles work on every OS, and WSL profiles start a Hub inside WSL on Windows
- **Remote server / Docker deployment assets** — run one Hub container per user from GHCR with loopback-only port publishing and an opt-in auto-update script
- **Clean transcript generation** — write readable `.txt` transcripts automatically, or regenerate them with `log-clean`
- **Language switching** (English / Japanese / Vietnamese)
- **Local-first UI** — Hub HTTP/WebSocket server binds to `127.0.0.1` only; no telemetry from `many-ai-cli` itself
- **Remote access protection** — Settings → "Remote access protection" offers a **Revoke all access** kill switch (regenerates the token and auth cookie when a device is lost), an **optional PIN** required only for non-loopback access (off by default, with lockout), and **new-device connection notifications**
- **Multiple subscriptions per provider** — seven CLIs in one Hub; Claude, Codex, Grok, and opencode can stack extra paid plans per session. The Usage menu shows remaining quota per profile for Claude, Codex, and Grok (see below)
## Multiple subscriptions per provider
Seven AI coding CLIs share one dashboard. Four of them — Claude Code, Codex CLI, Grok Build CLI, and opencode — can attach more than one subscription each, so two sessions can use two plans at the same time. Copilot and Cursor stay on a single login (their credentials are not relocatable). The official CLIs still remember one *default* login; the Hub points each session at a different config directory.
This is **not an API key router**. It does not pool metered API keys to make requests cheaper; it spreads the sessions you already run across the monthly subscriptions you already pay for. It is also not a way around a plan's usage limit — before stacking several of your own accounts with one vendor, read the warning under [Security / Privacy](#security--privacy).
**Remaining quota** is the breakdown of that stack, not a separate product. The Usage menu lists each profile and, for Claude (5h / 7d), Codex, and Grok, the remaining figure. Copilot, Cursor, and OpenCode stay as links to the vendor page — Cursor Agent CLI in particular has no local file or command that reports remaining quota (checked on the Free tier), so it cannot be detected. Numbers are read when you open the menu, not on a timer; Claude may run a one-turn probe if nothing is already reporting.
**How it works.** Every supported CLI selects its configuration directory from an environment variable. `many-ai-cli` creates one directory per profile under `~/.many-ai-cli/subscriptions/<provider>/<id>` and sets that variable when it launches the session. The official CLI does its own login and owns the credential inside that directory. `many-ai-cli` never reads, writes, parses, or stores the token, and `config.yaml` holds nothing but the profile's id, display name, plan label, and enabled flag.
| Provider | Variable used | Status |
|---|---|---|
| Claude Code | `CLAUDE_CONFIG_DIR` | supported |
| Codex CLI | `CODEX_HOME` | supported |
| Grok Build CLI | `GROK_HOME` | supported |
| opencode | `XDG_DATA_HOME` | supported — see the note below |
| GitHub Copilot CLI | — | **not supported**: the token lives in the OS credential store, so `COPILOT_HOME` moves the config but not the login |
| Cursor Agent CLI | — | **not supported**: the token lives in `~/.cursor/cli-config.json` and no environment variable relocates it |
| Command Code | — | **not supported**: no profile directory is wired up, so it has no remaining-quota reading either |
**Using it**
1. Settings → **Subscriptions** → type a display name → **Add**. This only creates an empty directory; nothing is signed in yet.
2. Press **Log in**. A short-lived session opens and runs the CLI's own login command (`claude auth login`, `codex login`, …) with that directory selected. Complete the vendor's normal sign-in.
3. Press **Check** to confirm the profile is signed in. The status line shows the plan when the CLI reports one; your account address is never requested or displayed.
4. When a provider has two or more profiles, the spawn form gains a **Subscription** selector. `Default CLI login` — the first entry — behaves exactly as before, and `auto` picks one of the enabled profiles in turn (the session records which one was actually chosen, not the word "auto").
**What a profile changes.** For Claude Code, Codex and Grok the variable switches the CLI's *whole* configuration directory, so the settings, global memory file, skills, commands and conversation history split along with the login. opencode is the exception: only its credential store moves, so config and skills stay shared.
**Your everyday configuration is carried in for you.** When `many-ai-cli` prepares a profile it copies the parts you would otherwise lose from your default directory — for Claude that is `CLAUDE.md`, `settings.json` (including your approval allowlist and hooks), `skills` and `commands`; for Codex and Grok, `AGENTS.md`, `config.toml` (including the approval policy and trusted folders) and `prompts`.
- **Nothing that already exists in a profile is ever overwritten.** A value you changed inside a profile stays; only what is missing gets added.
- **Directories are linked** (a junction on Windows), so a skill you add later reaches every profile at once. Files are copied, because the CLI rewrites them and a link would push a profile's edits back into your default directory.
- **Rule files are the one exception**: if your default `CLAUDE.md` (or `AGENTS.md` for Codex/Grok) is itself a symlink, a profile gets a symlink to the same resolved target instead of a copy, so editing the original reaches every profile with no re-seed. If the link cannot be made (Windows without Developer Mode), it falls back to a copy and `many-ai-cli doctor` says so. Replace the link with a regular file if you want that profile's rules to diverge from the default — it is never overwritten.
- **Credentials are never carried.** `.credentials.json` and `auth.json` are excluded. Claude's `.claude.json` mixes account identity with preferences, so two named keys are copied rather than the file. <!-- secrets-scan: allow .credentials.json -->
- Writes land only under `~/.many-ai-cli/subscriptions/`; your `~/.claude`, `~/.codex` and `~/.grok` are read and never written, and `many-ai-cli uninstall` removes everything this creates.
- Later changes to your default directory are not followed automatically. `many-ai-cli doctor` reports what your default has that a profile does not.
**Browser integration follows the directory too.** Claude in Chrome keeps its enabled state inside the configuration directory. That "enabled by default" preference is one of the things carried into a new profile, but actually reaching the browser is a separate matter. The native-messaging registration it writes is a single per-user slot shared by every Chrome profile and by Edge, so whichever configuration directory enabled it last is the one the browser talks to, and enabling from another profile moves the slot rather than adding one. The browser extension also has to be signed in to the same Claude account as the session. In practice one configuration directory owns the browser at a time; two accounts cannot drive it in parallel. `many-ai-cli` sets the environment variable and nothing else — it neither writes nor reads any of this state.
`XDG_DATA_HOME` is a generic variable rather than an opencode-specific one, so other XDG-aware tools the agent runs *inside that session* also write under the profile directory. Your shell is untouched. opencode has no dedicated variable today; if it grows one, this switches to it.
**Removing a profile** unregisters it from `many-ai-cli` and leaves the vendor credentials in place. Deleting the credentials as well is a separate, explicit confirmation, and it is never applied to a directory you pointed at yourself with `profile_dir`.
If you never open this section, nothing changes: sessions launch with the environment they always had, byte for byte.
---
## Custom providers (power users)
Beyond the [seven built-in CLIs](#supported-providers), you can register your own AI CLI as a spawn option by hand-editing `custom_providers:` in `config.yaml`. There is no "Add provider" button anywhere in the Hub UI — writing `config.yaml` yourself is the only way in, and the only way to change or remove an entry too. Once added, a custom provider spawns and attaches through the PTY exactly like a built-in one, including being counted for approval detection.
```yaml
custom_providers:
- id: my-cli # spawn value: lowercase letters/digits/./_/- only; must not match a built-in provider id or the reserved id "shell"
label: My CLI # optional; shown in the spawn dropdown in place of id
command: my-cli --agent # command line many-ai-cli runs for this provider — see "How command is parsed" below
approval_pattern_source: <absolute path under your .many-ai-cli config dir>/my-cli-approval-patterns.md # optional — see "Approval detection" below for the exact rule (no "~" expansion)
```
Leave `custom_providers:` out entirely — the default — and nothing about `many-ai-cli` changes.
**How `command` is parsed.** `many-ai-cli` splits it into an executable plus arguments itself; it never hands the string to a shell. The rules are deliberately small and fixed:
- ASCII spaces and tabs separate arguments; runs of them collapse to one
- `"..."` quotes one argument, or part of one — quoting can start and end mid-argument (`--path="C:\a b\c"` becomes `--path=C:\a b\c`); the quotes themselves are removed
- `""` inside a quoted span is a literal `"` character
- `\` is always a literal character, never an escape — Windows paths (`C:\a\b.exe`) need no special handling
- Nothing else is expanded or interpreted: environment variables (`$X`, `%X%`), `~`, globs, and shell operators (`|`, `&&`, `;`, `>`, `<`) all pass through as literal argument text, because the string never reaches a real shell
- An unterminated quote or an empty command is rejected before anything starts
**Nothing built-in gets attached to a custom provider.** No `--model`, permission-mode/sandbox/ask-for-approval flags, `ANTHROPIC_*` / `OPENAI_*` environment presets, Ollama/LM Studio routing, or subscription profile selection — none of that has a defined meaning for an arbitrary CLI, so the spawn form hides the model field for a custom provider and the Hub never adds any of it. Only `command`'s own arguments and the common `MANY_AI_CLI*` session environment reach the process.
**Approval detection works for a custom provider two ways.** A generic text heuristic — approval-shaped wording and option labels (Yes/No/Allow/Deny and similar) — runs for every custom session automatically, the same as it does server-side for the built-in ones. On top of that, `approval_pattern_source` lets you add your CLI's own trigger phrases: point it at a markdown file with one backtick-quoted phrase per bullet (the same format the built-in `resources/approval-patterns/*.md` files use), and the Hub fetches or reads it once at startup into `~/.many-ai-cli/approval-patterns/<id>.json`, which the browser then loads the same way it already loads the 7 built-in providers' pattern files. The source itself is constrained the same way the built-in pattern-source override is: either an absolute local path under `~/.many-ai-cli/` (no `~` expansion — write the real path) or an `https://raw.githubusercontent.com/...` URL; anything else is rejected. `many-ai-cli doctor` reports whether a configured source has actually synced yet — restart the Hub if it hasn't, and check `hub.log` if it stays missing. The **hook** that writes an approval-rules block into `CLAUDE.md` / `AGENTS.md` is built-in only and is never applied to a custom provider.
If `command`'s executable is not on PATH, the session ends the same way a missing built-in CLI would (`... not found in PATH`); `many-ai-cli doctor` checks PATH for every configured custom provider without ever running it.
**This is a power-user setting, and it carries none of the review that goes into the built-in list.** The terms-of-service judgment calls described under [Security / Privacy](#security--privacy) — including why Gemini CLI is out of scope — are about the *built-in* provider list only. Whatever CLI you point `command` at is entirely your own choice, and checking that CLI's own terms of service before you wire it in is on you. `many-ai-cli doctor` reports how many custom providers are configured, as a standing reminder; it does not warn you again on every spawn.
---
## Requirements
| Item | Requirement |
|---|---|
| Go | 1.25+ (build time) |
| OS | Windows 10/11, macOS, Linux |
| Browser | Chrome / Edge / Firefox / Safari |
| AI CLI | Claude Code, Codex CLI, GitHub Copilot CLI, Cursor Agent CLI, Grok Build CLI (install the providers you intend to use separately) |
### Platform verification
- Verified in real environments: Windows local Hub and the Windows unified launcher (`wsl` / SSH tunnel profiles)
- Not yet fully verified in real environments: native Linux, native macOS
Linux/macOS builds are expected to work, but they have not been fully validated in real environments yet. Please use at your own discretion and report any issues.
---
## Quick Download
### Install via a package manager
**Developer install (npm registry — recommended):**
```powershell
pnpm add -g many-ai-cli
```
Fallbacks (same registry, pick whichever you already have):
```powershell
bun install -g many-ai-cli
npm install -g many-ai-cli
```
Once installed → next: [Getting started (right after install)](#getting-started-right-after-install). If your shell has not picked up the global bin yet, `pnpm exec many-ai-cli setup` still creates the shortcuts.
> Published to the npm registry since v0.3.0. The package ships the native Go binary for your platform as an optional dependency, so nothing is downloaded in a browser — the launcher is generated locally at install time and carries no Mark-of-the-Web, which avoids that SmartScreen trigger. This is **not** a substitute for Authenticode signing: Smart App Control / WDAC / AppLocker / EDR / antivirus policies are handled separately. If the global command is not found after install, run `pnpm setup` (or reopen your shell) so the global bin directory is on your `PATH`.
**Windows (winget) — one-line paste:**
```powershell
winget install ishizakahiroshi.many-ai-cli; & "$env:LOCALAPPDATA\Microsoft\WinGet\Links\many-ai-cli.exe" setup
```
Once installed → [Getting started](#getting-started-right-after-install).
> Immediately after `winget install`, the current window does not have the new `PATH`, so `setup` is invoked through the winget shim directory with its full path (opening a fresh terminal and running `many-ai-cli setup` works too).
> Available once the first winget manifest PR is merged into `microsoft/winget-pkgs`. Until then, use the zip download below.
> On Windows, the package-manager path is preferred when available because it avoids the browser-downloaded zip/exe flow that commonly carries Mark-of-the-Web. It is still not a substitute for Authenticode code signing or organization allowlisting.
**macOS (Homebrew) — one-line paste:**
```bash
brew install --cask ishizakahiroshi/tap/many-ai-cli && many-ai-cli setup
```
Once installed → [Getting started](#getting-started-right-after-install).
**Linux — Debian / Ubuntu (.deb) and RHEL-family (.rpm):**
Download the package from [GitHub Releases](https://github.com/ishizakahiroshi/many-ai-cli/releases/latest), then:
```bash
sudo dpkg -i many-ai-cli_<version>_amd64.deb && many-ai-cli setup # Debian / Ubuntu
sudo rpm -i many-ai-cli-<version>.x86_64.rpm && many-ai-cli setup # RHEL family
```
Once installed → [Getting started](#getting-started-right-after-install).
### Manual download (all platforms)
Get the latest release from [GitHub Releases](https://github.com/ishizakahiroshi/many-ai-cli/releases/latest).
| Platform | Download |
|----------|----------|
| Windows (x64) | `many-ai-cli-<version>-windows-x64.zip` |
| macOS (Intel) | `many-ai-cli-<version>-macos-intel.zip` |
| macOS (Apple Silicon) | `many-ai-cli-<version>-macos-apple-silicon.zip` |
| Linux (x64) | `many-ai-cli-<version>-linux-x64.zip` |
Extract the zip and place the binary somewhere on your `PATH`.
> Settings and logs are stored in `~/.many-ai-cli/` (created on first run).
> Session logs contain user input and AI output. Treat them as sensitive data.
### Windows Security Warnings
The Windows release binaries are not currently Authenticode-signed.
`SHA256SUMS.txt` verifies release integrity, but it is not code signing for the
`.exe` files. Windows blocks can come from several different systems:
- **Mark-of-the-Web**: downloaded zip/exe files can carry an internet-zone mark.
After extracting the Windows zip, run `unblock-windows.cmd` from the extracted
folder. It uses PowerShell `Unblock-File` only on `many-ai-cli*.exe` in that
same folder, does not require administrator rights, does not change system
policy permanently, and does not launch the app.
- **SmartScreen**: Windows may warn that the app is uncommon or from an unknown
publisher. Only continue if you intentionally downloaded the release and, when
needed, verified the checksum/signature.
- **Smart App Control**: on some Windows 11 PCs this can fully block unsigned
apps. `unblock-windows.cmd` cannot bypass that; unsigned `.exe` distribution
has no supported workaround for this case.
- **Organization policy**: AppLocker, WDAC, EDR, antivirus, or other managed-PC
policies can block local tools independently. Follow your organization's
allowlisting process rather than disabling those controls.
When winget is available, prefer it over manual zip download on Windows. The
manual zip remains supported for users who need direct release artifacts.
The Hub itself binds to `127.0.0.1` only, so normal local use does not require
opening the server to the LAN or adding a public Windows Firewall exception.
Recommended Windows zip flow:
1. Download `many-ai-cli-<version>-windows-x64.zip` from GitHub Releases
2. Verify `SHA256SUMS.txt` / cosign signature if required
3. Extract the zip
4. Run `unblock-windows.cmd`
5. Start `many-ai-cli.exe` or `many-ai-cli-launcher.exe` manually
#### Double-clicking `many-ai-cli.exe` directly (not recommended)
> **Not recommended:** browser-downloaded zip / exe files are the main trigger for Mark-of-the-Web and SmartScreen warnings. When possible, use a package manager install plus `many-ai-cli setup` (see [Getting started](#getting-started-right-after-install)) instead.
If you still want to use the exe straight from the extracted zip, the previous flow is:
1. Extract the zip and, if needed, run `unblock-windows.cmd`
2. **Double-click `many-ai-cli.exe`** (or run `many-ai-cli` with no arguments)
- The Hub starts and your browser opens automatically at `http://127.0.0.1:47777/?token=<token>`
- If a Hub is already running, your browser is reopened against the existing instance
3. In the Hub UI, click **"+ New Session"** to launch a wrapped AI CLI session
4. To stop the Hub intentionally, use the `⏻` button in the top-right of the Hub UI, or run `many-ai-cli stop` from another terminal
### Verify Release Artifacts (Checksum + Signature)
`v0.1.2` and later releases include:
- `SHA256SUMS.txt`
- `SHA256SUMS.txt.sig`
- `SHA256SUMS.txt.pem`
1. Verify the signature on `SHA256SUMS.txt`:
```bash
cosign verify-blob \
--certificate SHA256SUMS.txt.pem \
--signature SHA256SUMS.txt.sig \
--certificate-identity-regexp "https://github.com/ishizakahiroshi/many-ai-cli/.github/workflows/release.yml@refs/tags/v.*" \
--certificate-oidc-issuer "https://token.actions.githubusercontent.com" \
SHA256SUMS.txt
```
2. Verify your downloaded binary against the checksums:
```bash
sha256sum -c SHA256SUMS.txt
```
---
## Getting started (right after install)
Whichever install path you used, the next steps are the same.
1. Run this **once**:
```
many-ai-cli setup
```
On **Windows** it creates a single **"MANY-AI-CLI"** shortcut on your desktop, which starts a tray icon, and puts the same shortcut in your **Startup folder** so the tray is there after you sign in. If you would rather launch it yourself, delete "MANY-AI-CLI" from the Startup folder or switch it off in **Task Manager → Startup apps**. On macOS and Linux it creates **"Many AI Hub Start"** and **"Many AI Hub Stop"** (`.command` / `.desktop`).
2. From now on, just **double-click the desktop shortcut**. On Windows a tray icon appears; click it and choose **"Hub を開く"** to start the Hub if needed and open it in your browser at `http://127.0.0.1:47777/?token=<token>`. On macOS and Linux, "Many AI Hub Start" opens a console window alongside the browser.
3. In the Hub UI, click **"+ New Session"** in the lower left to launch one of the wrapped AI CLIs (claude / codex / copilot / cursor-agent / opencode / grok). When an approval prompt appears, an action bar shows up under the input — click a button or use the keyboard.
To stop, use the tray menu's **"Hub を停止"** (Windows), **"Many AI Hub Stop"** on your desktop (macOS / Linux), the `⏻` button in the top-right of the Hub UI, or `many-ai-cli stop` from another terminal. If you prefer a terminal, `many-ai-cli serve --open` still works.
> **Upgrading from an earlier version?** The tray does not appear just because you installed a newer binary — **run `setup` once** to get the "MANY-AI-CLI" shortcut and the sign-in entry. Doing so **leaves your existing "Start" and "Stop" icons in place** — they keep working. Delete them yourself once you have switched to the tray; `setup` will never remove them for you. An older desktop icon named "Many AI Hub" is the same launcher under the previous name; `setup` replaces it with "MANY-AI-CLI".
> **⚠ About the console window (macOS / Linux)**
> Launching "Many AI Hub Start" opens a console window alongside the browser. **That console *is* the Hub server process** — closing it with `×` terminates the Hub. If it gets in the way, **minimize** it instead of closing it. On Windows the tray starts the Hub detached, so there is no console window to keep open.
> If the Hub does go down (whether by `×`, a crash, or a manual restart), running AI sessions wait up to **60 minutes** for the Hub to come back before terminating themselves (configurable in `config.yaml` up to 24 hours — extend it for long-running autonomous tasks). A Web UI bug or restart will not silently kill your work. See [Shutdown, zombie protection & Hub crash resilience](#shutdown-zombie-protection--hub-crash-resilience) for details.
> On Linux (GNOME), the first time you use a `.desktop` shortcut on the desktop, right-click it and choose **"Allow Launching"** (this is an OS-level requirement).
### Tip: one skills shelf and one canonical rule file for every wrapped CLI
Once several CLIs are running side by side here, the next annoyance is not `many-ai-cli` itself. Each CLI keeps its skills in its own folder, and each reads a different rule file (`CLAUDE.md`, `AGENTS.md`, `GEMINI.md`, ...). Writing the same rules once per CLI is where the duplication actually hurts.
You can keep **one** skills shelf and **one** canonical rule file, and let each CLI reach them its own way: symlinks (junctions on Windows) for the shelf, and a one-line pointer for the rules. The guide below walks through it for Claude Code / Codex / OpenCode / GitHub Copilot CLI / Grok / Cursor Agent / Gemini CLI / Antigravity, and the "which CLI actually reads which file" part is **measured, not guessed**.
- The procedure: [docs/manual_shared-skills-and-rules.md](docs/manual_shared-skills-and-rules.md). It is written to be handed straight to an AI agent, stop conditions included.
- A narrative version with diagrams, **in Japanese**: <https://ishizakahiroshi.com/articles/2026/2026-08-30_multi-ai-cli-shared-skills-and-rules/>
The wiring is independent of this tool: it works with or without the Hub. It simply pairs well with running several CLIs at once.
### Unified launcher (Windows / Linux / macOS)
`many-ai-cli-launcher` (`many-ai-cli-launcher.exe` on Windows) is a unified launcher that manages connection profiles for both WSL and remote server targets. Connection profiles are stored in `~/.many-ai-cli/launcher-profiles.yaml`.
The launcher binary ships for all platforms. `ssh` profiles (`serve` / `tunnel`) work on Windows, Linux, and macOS; `wsl` profiles are Windows-only and report a clear error on other operating systems. On Linux the launcher opens the browser with `xdg-open`, and on macOS with `open`.
#### How it works
The launcher reads your saved profiles and connects to the right Hub — starting one if needed — then opens the browser automatically. Two profile types are supported:
| Type | Use case |
|---|---|
| `wsl` | Start `many-ai-cli serve` inside WSL and open it from the Windows browser (Windows only) |
| `ssh` | Connect to a remote machine (e.g. a remote server or home machine) over SSH (any OS) |
`ssh` profiles additionally support two connection modes:
| Mode | Use case |
|---|---|
| `serve` | SSH into a remote server and start `many-ai-cli serve` on the remote side |
| `tunnel` | Port-forward to a Hub already running on the remote side (kept resident via systemd / tmux / Docker compose, etc.) |
In both modes, the Hub continues to bind to `127.0.0.1` only on the remote. The SSH local forward (`-L 127.0.0.1:<port>:127.0.0.1:<port>`) makes it reachable from the Windows browser without exposing the Hub to the network.
A `wsl` profile calls `wsl.exe` internally to start the Linux binary (`many-ai-cli serve`) inside WSL; as soon as the Linux side prints the Hub URL, the Windows default browser opens automatically. The shell is launched with `bash -ilc` (login + interactive), so `~/.bashrc` entries — including `nvm`, `pnpm`, `cargo`, etc. — are fully loaded and in `PATH`. If a port collision is detected on the Windows side (e.g. `many-ai-cli.exe` already holds 47777), the launcher picks the next available port automatically.
#### Setup
The launcher binary is bundled in every release archive next to the main binary (and in the deb/rpm/Homebrew packages). On Windows, download `many-ai-cli-<version>-windows-x64.zip`, extract `many-ai-cli-launcher.exe`, and place it on your `PATH`. On Linux/macOS, extract `many-ai-cli-launcher` from your platform's archive (or install via the package manager) and put it on your `PATH`.
Create `~/.many-ai-cli/launcher-profiles.yaml`:
```yaml
version: 1
profiles:
# WSL profile — starts the Hub inside WSL
- name: my-wsl
type: wsl
distro: Ubuntu-22.04 # omit to use the default WSL distro
hub_port: 0 # 0 = auto-select to avoid Windows-side collisions
# Remote server profile (serve mode) — SSH in and start many-ai-cli serve
- name: my-remote
type: ssh
mode: serve
host: remote.example.com
user: your-user
hub_port: 47777
# Remote server profile (tunnel mode) — forward to a resident Hub (systemd / tmux / Docker)
- name: remote-docker
type: ssh
mode: tunnel
host: remote.example.com
user: your-user
hub_port: 47801
token_command: "docker exec many-ai-cli-user1 sh -c 'grep ^token ~/.many-ai-cli/config.yaml | cut -d\" \" -f2'"
```
#### WSL profile prerequisite: the Linux binary inside WSL
A `wsl` profile requires the Linux `many-ai-cli` binary somewhere on the WSL `PATH`. Download `many-ai-cli-<version>-linux-x64.zip` from the releases page, extract it, and place the binary:
```bash
unzip many-ai-cli-<version>-linux-x64.zip
# Using ~/.local/bin (per-user, no sudo required)
mkdir -p ~/.local/bin
mv many-ai-cli ~/.local/bin/many-ai-cli
chmod +x ~/.local/bin/many-ai-cli
# Verify ~/.local/bin is on PATH
echo $PATH | grep -q "$HOME/.local/bin" && echo "OK" || echo "Add ~/.local/bin to PATH"
```
If `~/.local/bin` is not on your `PATH`, add it to `~/.bashrc`:
```bash
export PATH="$HOME/.local/bin:$PATH"
```
Or, to install system-wide (requires sudo):
```bash
sudo mv many-ai-cli /usr/local/bin/many-ai-cli
sudo chmod +x /usr/local/bin/many-ai-cli
```
Verify inside WSL:
```bash
many-ai-cli --version
```
#### Tunnel mode: end-to-end setup
`tunnel` mode connects to a Hub that keeps running on the remote — closing the launcher window only drops the SSH tunnel, while the Hub and your AI sessions keep running. Reconnect later and pick up exactly where you left off. Here is the full flow from zero.
**A. Remote side (one-time)**
1. Place the Linux `many-ai-cli` binary on the remote machine and make it executable.
2. Start the Hub with a **fixed port** (auto-select is not allowed in tunnel mode) and keep it resident — systemd, tmux/screen, or Docker all work:
```bash
many-ai-cli serve --port 47777
```
On first start a random access token is generated and saved to `~/.many-ai-cli/config.yaml` (`token:` key).
3. Decide the command that prints that token — this becomes `token_command` in the profile. Example:
```bash
awk '/^token:/{print $2}' ~/.many-ai-cli/config.yaml
```
Run it once over SSH and confirm it prints a single token line.
**B. Windows side (one-time)**
4. Set up SSH **key-based** authentication. The launcher runs `ssh.exe` with `-o BatchMode=yes` (no interactive prompts), so password authentication will not work. Make sure `ssh your-user@host` logs in without a password prompt.
5. Create a profile — either in the launcher UI (Type: SSH / Mode: tunnel) or directly in `launcher-profiles.yaml`:
| Field | Value | Required |
|---|---|---|
| `name` | any name | yes |
| `type` | `ssh` | yes |
| `mode` | `tunnel` | yes |
| `host` | remote IP / hostname | yes |
| `user` | SSH login user (empty = ssh default) | no |
| `ssh_port` | non-22 port if needed (0 = default) | no |
| `identity_file` | empty = default key / agent | no |
| `hub_port` | the port from step 2 (e.g. `47777`) — must match | yes |
| `token_command` | the command from step 3 | yes |
**C. Daily use**
1. Start the launcher and pick the profile. It automatically establishes the tunnel, fetches the token via `token_command`, waits for the Hub to respond, and opens the browser.
2. Work in the Hub UI as usual (spawn sessions, approve, etc.).
3. When done, just close the launcher window — only the tunnel drops; remote sessions keep running.
4. Next time, reconnect with the same profile and continue where you left off.
**Common pitfalls**
- **Port mismatch** — the remote `serve --port` and the profile's `hub_port` must be the same number.
- **Password prompt** — BatchMode fails immediately; key authentication is mandatory.
- **Empty `token_command` output** — the Hub must have been started at least once on the remote, otherwise `config.yaml` has no token yet.
- **Docker** — publish the container's Hub port to the host's `127.0.0.1` (the tunnel terminates at the remote machine's `127.0.0.1:<hub_port>`).
#### Launch
```powershell
many-ai-cli-launcher.exe # auto-connect if only one profile; otherwise open selection UI
many-ai-cli-launcher.exe --profile my-remote # connect to a specific profile
many-ai-cli-launcher.exe --last # reconnect using the last-used profile
many-ai-cli-launcher.exe --ui # always open the selection UI
```
#### Security
The launcher does not change the Hub's security model:
- The Hub binds to `127.0.0.1` only — no `0.0.0.0` binding, no reverse proxy exposure
- SSH forwarding uses `127.0.0.1`-to-`127.0.0.1` local forward only (no `-g` or `GatewayPorts`)
- Passwords and key passphrases are never saved; key-based authentication is required (`-o BatchMode=yes`)
- The token retrieved by `token_command` is used only for the current session and is not written to `launcher-profiles.yaml`
For the full profile schema and connection flow details, see [docs/v0.3.x-many-ai-cli-design.md — §13](docs/v0.3.x-many-ai-cli-design.md).
#### If Windows blocks the launcher: remote-server access without local `.exe`
If Windows SmartScreen or company policy prevents `many-ai-cli-launcher.exe` from running, users can still connect to a remote-hosted Hub without running any many-ai-cli executable on Windows. This route uses only:
- the Windows built-in OpenSSH client (`ssh.exe`)
- a normal browser
- the Linux `many-ai-cli` binary or Docker container on the remote server
The tradeoff is that setup is more manual: the user keeps one SSH tunnel window open, then opens the Hub URL in the browser.
**Simpler routes that avoid the SmartScreen dialog**
Launching from a terminal (via `CreateProcess`) does not go through Explorer's reputation check, so the SmartScreen "Windows protected your PC" dialog generally does not appear. Two terminal-launched routes use the main `many-ai-cli` binary and never require double-clicking `many-ai-cli-launcher.exe`:
- **Hub 🖥 Server button** — run `many-ai-cli serve` (or just start the Hub), open the dashboard, and click **🖥 Server** in the header. Manage connection profiles and connect/disconnect there; a successful connection opens the target Hub in a new tab. The SSH/WSL child process is held by the Hub itself, so no extra console window stays open.
- **`many-ai-cli connect`** — `many-ai-cli connect --profile <name>` (or `--last`) runs the same connection flow as the launcher straight from the terminal.
If you still hit a SmartScreen *dialog* (not an actual virus detection), clear the Mark-of-the-Web first: run `unblock-windows.cmd` from the extracted folder, or `Unblock-File` the binaries in PowerShell. Note this only dismisses the reputation prompt — if Microsoft Defender actually quarantines the binary (Go binaries are sometimes false-positives), code signing / an exclusion / a false-positive report is needed instead. Installing via a package manager avoids the Mark-of-the-Web entirely (the binary is built locally).
**What is saved where**
| Item | Saved on | Notes |
|---|---|---|
| SSH host, user, key path | Windows `%USERPROFILE%\.ssh\config` | Safe to keep locally; this is normal SSH configuration |
| Hub token | Remote server `~/.many-ai-cli/config.yaml` | Do not paste it into public chats, issues, or screenshots |
| Hub preferences, favorites, spawn defaults | Remote server `~/.many-ai-cli/config.yaml` | Persist across reconnects because the Hub runs on the remote server |
| Logs and attachments | Remote server `~/.many-ai-cli/logs/`, `~/.many-ai-cli/attachments/` | They are not stored on the Windows PC |
| Working repositories | Remote server filesystem | The Hub edits the remote server's files, not files on the Windows PC |
**A. Choose and prepare the remote server**
Use any provider that gives you a Linux VM with SSH access. A small Ubuntu 22.04/24.04 machine is enough to start; 1 GB RAM is a practical minimum, and 2 GB+ is more comfortable once provider CLIs and long sessions are running. Free tiers can work, but check whether they sleep, reset disks, or block long-lived SSH connections.
Keep the firewall/security group simple:
- allow SSH only (`22/tcp`, or your custom SSH port)
- do **not** open `47777`, `47877`, or any Hub port to the internet
- do **not** put the Hub behind nginx, Caddy, Cloudflare Tunnel, or a public reverse proxy
Install the Linux `many-ai-cli` binary on the remote server. One common per-user layout is:
```bash
mkdir -p ~/.local/bin
# Download and unzip many-ai-cli-<version>-linux-x64.zip from GitHub Releases.
mv many-ai-cli ~/.local/bin/many-ai-cli
chmod +x ~/.local/bin/many-ai-cli
echo 'export PATH="$HOME/.local/bin:$PATH"' >> ~/.bashrc
source ~/.bashrc
many-ai-cli --version
```
Also install and sign in to the provider CLIs you plan to use (`claude`, `codex`, `copilot`, `cursor-agent`, `grok`) on the remote server, because sessions run there.
**B. Start the Hub on a fixed loopback port**
For a first test, run it in a normal SSH shell:
```bash
mkdir -p ~/work
cd ~/work
many-ai-cli serve --port 47777
```
For daily use, keep it resident with `tmux`, `screen`, `systemd`, or Docker. The simplest manual option is `tmux`:
```bash
tmux new -s many-ai-cli
cd ~/work
many-ai-cli serve --port 47777
```
Detach from tmux with `Ctrl+B`, then `D`. Later, reattach with:
```bash
tmux attach -t many-ai-cli
```
Confirm the Hub is listening only on loopback:
```bash
ss -ltnp | grep ':47777'
```
Expected: `127.0.0.1:47777`. If you see `0.0.0.0:47777` or the remote server's public IP, stop and fix the setup before connecting.
Get the token:
```bash
awk '/^token:/{print $2}' ~/.many-ai-cli/config.yaml
```
**C. Save the SSH connection on Windows**
Create or edit `%USERPROFILE%\.ssh\config`:
```sshconfig
Host remote-host
HostName remote.example.com
User ubuntu
Port 22
IdentityFile ~/.ssh/id_ed25519
ServerAliveInterval 30
```
Test it from PowerShell:
```powershell
ssh remote-host
```
If SSH asks for a password every time, set up key authentication first. The tunnel can be kept open with password auth, but key auth is much less error-prone.
**D. Open the tunnel**
In a Windows PowerShell window, run:
```powershell
ssh -N -T `
-o ExitOnForwardFailure=yes `
-o ServerAliveInterval=30 `
-L 127.0.0.1:47777:127.0.0.1:47777 `
remote-host
```
Keep that window open. It is the private cable between your browser and the remote server's Hub.
Now open this in the Windows browser:
```text
http://127.0.0.1:47777/?token=<token-from-the-remote-server>
```
Do not replace `127.0.0.1` with the remote server's IP address. The browser should always connect to the local forwarded port.
**Optional: a local `.cmd` tunnel shortcut**
Users who do not want to remember the SSH command can create a local file such as `connect-many-ai-cli.cmd`. This file does not contain the token; it fetches the token over SSH each time and opens the browser after starting the tunnel.
```batch
@echo off
set HOST=remote-host
set PORT=47777
for /f "tokens=2" %%T in ('ssh %HOST% "cat ~/.many-ai-cli/config.yaml" ^| findstr /b token:') do set TOKEN=%%T
if "%TOKEN%"=="" (
echo Failed to read Hub token from %HOST%.
pause
exit /b 1
)
start "many-ai-cli tunnel" ssh -N -T -o ExitOnForwardFailure=yes -o ServerAliveInterval=30 -L 127.0.0.1:%PORT%:127.0.0.1:%PORT% %HOST%
timeout /t 2 >nul
start "" "http://127.0.0.1:%PORT%/?token=%TOKEN%"
```
Close the `many-ai-cli tunnel` window to disconnect. The remote Hub and any remote sessions continue if you started the Hub with `tmux`, `systemd`, or Docker.
**Common no-launcher pitfalls**
- **Browser shows 403/404/blank** - the token is wrong or the remote Hub was restarted; fetch the token again from the remote server.
- **Terminal area does not connect** - local and remote ports must match exactly: `47777:127.0.0.1:47777`.
- **`ssh: bind: Address already in use`** - another local process is using the port; choose a different fixed port on both the remote server's Hub and the SSH tunnel.
- **Files are "missing"** - the Hub runs on the remote server, so it sees the remote server's files only. Clone or mount the repository on the remote server.
- **Free-tier server disconnected** - reconnect SSH and, if needed, reattach/restart the tmux/systemd/Docker Hub.
---
## Using from a smartphone (iPhone / Android)
> **Note (beta / draft)** — The smartphone UI is a preview in v0.3.x. Layout, interactions, and notification behavior may change in future releases. Please share feedback via GitHub Issues.
The Hub UI is mobile-ready (responsive layout, touch-sized buttons, a mobile key panel for Esc/Ctrl/arrows, and PWA support). Because the Hub binds to `127.0.0.1` only, a phone cannot reach it over Wi-Fi by opening the PC's LAN IP — and that is by design. Instead, the phone uses the same pattern as remote PC access: **an SSH local forward that points the phone's own `127.0.0.1` at the Hub.** No public exposure is required (and none is supported).
**What you need on the phone**
- An SSH client app that supports local port forwarding (e.g. [Termius](https://termius.com/) — the free plan is enough)
- A normal browser (Safari / Chrome)
### A. Home PC on the same Wi-Fi
1. Enable an SSH server on the PC that runs the Hub
- Windows: Settings → System → Optional features → add **OpenSSH Server**, then start the `sshd` service
- macOS: System Settings → General → Sharing → **Remote Login**
- Linux: install/enable `sshd`
2. In Termius, register the PC as a host (its LAN IP, e.g. `192.168.x.x`, with your PC user; key auth recommended)
3. Add a **Port Forwarding** rule: type **Local**, phone side `127.0.0.1:47777` → destination `127.0.0.1:47777`
4. Connect the tunnel, then open `http://127.0.0.1:47777/?token=<token>` in the phone browser (the token comes from the PC's `serve` output or `~/.many-ai-cli/config.yaml`)
5. Share menu → **Add to Home Screen** to install it as a PWA — from then on it launches like an app
### B. Remote server
Identical to A, with the remote server as the Termius host. If you also use a home PC Hub, give each destination its own phone-side port (next section).
### Port allocation for multiple Hubs
A tunnel occupies the phone-side listen port, and on a PC that runs its own Hub, local port `47777` is already taken — so assign one fixed phone-side port per destination:
| Destination | Phone-side URL | Termius local forward |
|---|---|---|
| Home PC | `http://127.0.0.1:47777/?token=<PC token>` | `47777` → `127.0.0.1:47777` |
| Remote | `http://127.0.0.1:47778/?token=<remote token>` | `47778` → remote `127.0.0.1:47777` |
The Hub itself stays on `47777` everywhere; only the phone-side listen port differs. Do **not** reuse one phone-side port for two Hubs: browsers treat the port as part of the origin, so reusing it would make two different Hubs share one PWA install, service worker, cache, and `localStorage` — and token mismatches after switching tunnels. Separate ports give you two independent home-screen icons ("Home" / "Remote") that never interfere.
### Mobile usage notes
- **iOS suspends background apps**, so the tunnel drops when Termius is backgrounded for a while. Sessions keep running on the host; reopening Termius reconnects, and the PWA picks up where it left off.
- **Web Push** (if enabled in Settings and subscribed) can still deliver notifications while the tunnel is down — but opening the Hub from a notification requires the tunnel to be reconnected first.
- The token regenerates when the Hub restarts; if the browser shows 403, fetch the current token again.
### Receiving approval notifications without the tunnel (ntfy / webhook)
Web Push requires a live browser subscription, which drops with the tunnel. **ntfy** is an outbound HTTP push service — the Hub POSTs to the ntfy server, and the ntfy app on your phone receives it. No persistent tunnel needed.
**Setup (ntfy — recommended for simplest experience)**
1. Install the [ntfy app](https://ntfy.sh/) on your phone (iOS / Android, free)
2. In the Hub Settings panel → **ntfy / webhook notification** → click **Configure...**
3. Click **+ Add ntfy**; leave the URL as `https://ntfy.sh` (or enter your self-hosted URL)
4. Click **Generate** next to Topic to create a random private topic name, then click **Save**
5. In the ntfy app, subscribe to the same topic (`anyaicli-xxxx`)
6. Click **Send test** to verify the phone receives the notification
7. Tick **Approval** under Events (default) so the Hub sends a notification on every approval prompt
The Hub token is **never included** in the ntfy payload. The topic name itself is the only shared secret — use a long random string (the Generate button produces one).
**Setup (generic webhook)**
Click **+ Add webhook** and enter any URL that accepts a `POST` request with JSON body `{"title":"...", "body":"..."}`. Examples: Discord webhooks, Slack incoming webhooks, custom relay servers.
---
## Launching from a terminal (advanced)
If you prefer driving things from a shell — for scripting, shell integration, or muscle memory — these options are equivalent to clicking "+ New Session" in the UI. Use whichever you like.
### Option A: provider as a subcommand
```bash
many-ai-cli claude # auto-starts Hub in the background if not running, then launches Claude
many-ai-cli codex # same
many-ai-cli copilot # same, using the installed GitHub Copilot CLI
many-ai-cli cursor-agent # same, using the installed Cursor Agent CLI
many-ai-cli grok # same, using the installed Grok Build CLI
many-ai-cli opencode # same, using the installed opencode
many-ai-cli command-code # same, using the installed Command Code
```
You do not need to run `many-ai-cli serve` first.
### Option B: `wrap` subcommand (for debugging)
```bash
many-ai-cli wrap claude
many-ai-cli wrap codex
many-ai-cli wrap copilot
many-ai-cli wrap cursor-agent
many-ai-cli wrap grok
```
Functionally identical to Option A; useful when you want to be explicit about the wrapper layer.
### Option C: transparent mode (`MANY_AI_CLI_AUTO`)
Initialize the shell once, then your normal `claude` / `codex` / `copilot` / `cursor-agent` / `grok` commands transparently go through the wrapper.
> `many-ai-cli shell-init` emits **POSIX shell (bash / zsh) only** function definitions. There is no PowerShell snippet — see below for a manual alternative.
```bash
# Run once per shell startup (bash / zsh)
eval "$(many-ai-cli shell-init)"
# Turn on per-session — only the shells where you opt in are wrapped
export MANY_AI_CLI_AUTO=1
claude # → goes through the wrapper, auto-starts Hub if needed
codex # → same
copilot # → same
cursor-agent # → same
grok # → same
```
Without `MANY_AI_CLI_AUTO=1`, `claude` / `codex` / `copilot` / `cursor-agent` / `grok` behave exactly as the original commands. No global `.bashrc` modification.
GitHub Copilot support only wraps the official installed CLI in a PTY. `many-ai-cli` does not read, store, or proxy GitHub OAuth tokens, PATs, or Copilot credentials.
Cursor Agent support only wraps the official installed `cursor-agent` CLI in a PTY (it assumes you are already signed in). `many-ai-cli` does not read, store, or proxy Cursor session tokens or credentials.
Grok support only wraps the official installed `grok` CLI (xAI's Grok Build CLI) in a PTY (it assumes you are already signed in via your grok.com login, which requires a SuperGrok or X Premium+ subscription). `many-ai-cli` does not read, store, or proxy xAI session tokens or credentials.
#### OS-specific automation examples
**PowerShell (Windows)**
Add the following to your `$PROFILE` (since `shell-init` does not support PowerShell, the functions are defined directly):
```powershell
if ($env:MANY_AI_CLI_AUTO -eq '1') {
function claude { many-ai-cli claude @args }
function codex { many-ai-cli codex @args }
function copilot { many-ai-cli copilot @args }
function cursor-agent { many-ai-cli cursor-agent @args }
function grok { many-ai-cli grok @args }
}
```
Set `MANY_AI_CLI_AUTO=1` on a specific Windows Terminal profile to enable transparent mode only in that tab:
```jsonc
{
"name": "AI Watch",
"commandline": "pwsh.exe -NoExit",
"environment": { "MANY_AI_CLI_AUTO": "1" }
}
```
**iTerm2 (macOS)**
- Profiles → Environment → Variables: `MANY_AI_CLI_AUTO=1`
- Profiles → General → Send text at start: `eval "$(many-ai-cli shell-init)"`
**tmux (all OSes)