{
"markdown": "# Isaac Sim MCP Server\n\n\n\n[](https://pypi.org/project/isaacsim-mcp-server/)\n[](https://developer.nvidia.com/isaac-sim)\n[](https://www.python.org/downloads/)\n[](https://opensource.org/licenses/MIT)\n[](https://archestra.ai/mcp-catalog/api/badge/quality/whats2000/isaacsim-mcp-server)\n[](https://glama.ai/mcp/servers/whats2000/isaacsim-mcp-server)\n\n> Natural language control for NVIDIA Isaac Sim through the [Model Context Protocol](https://modelcontextprotocol.io/) (MCP).\n\nConnect any MCP-compatible IDE (Cursor, VS Code, Claude Code, Windsurf, Antigravity, JetBrains) to a running Isaac Sim instance and control it with plain-English prompts -- create robots, build scenes, run simulations, and debug physics all from your editor.\n\n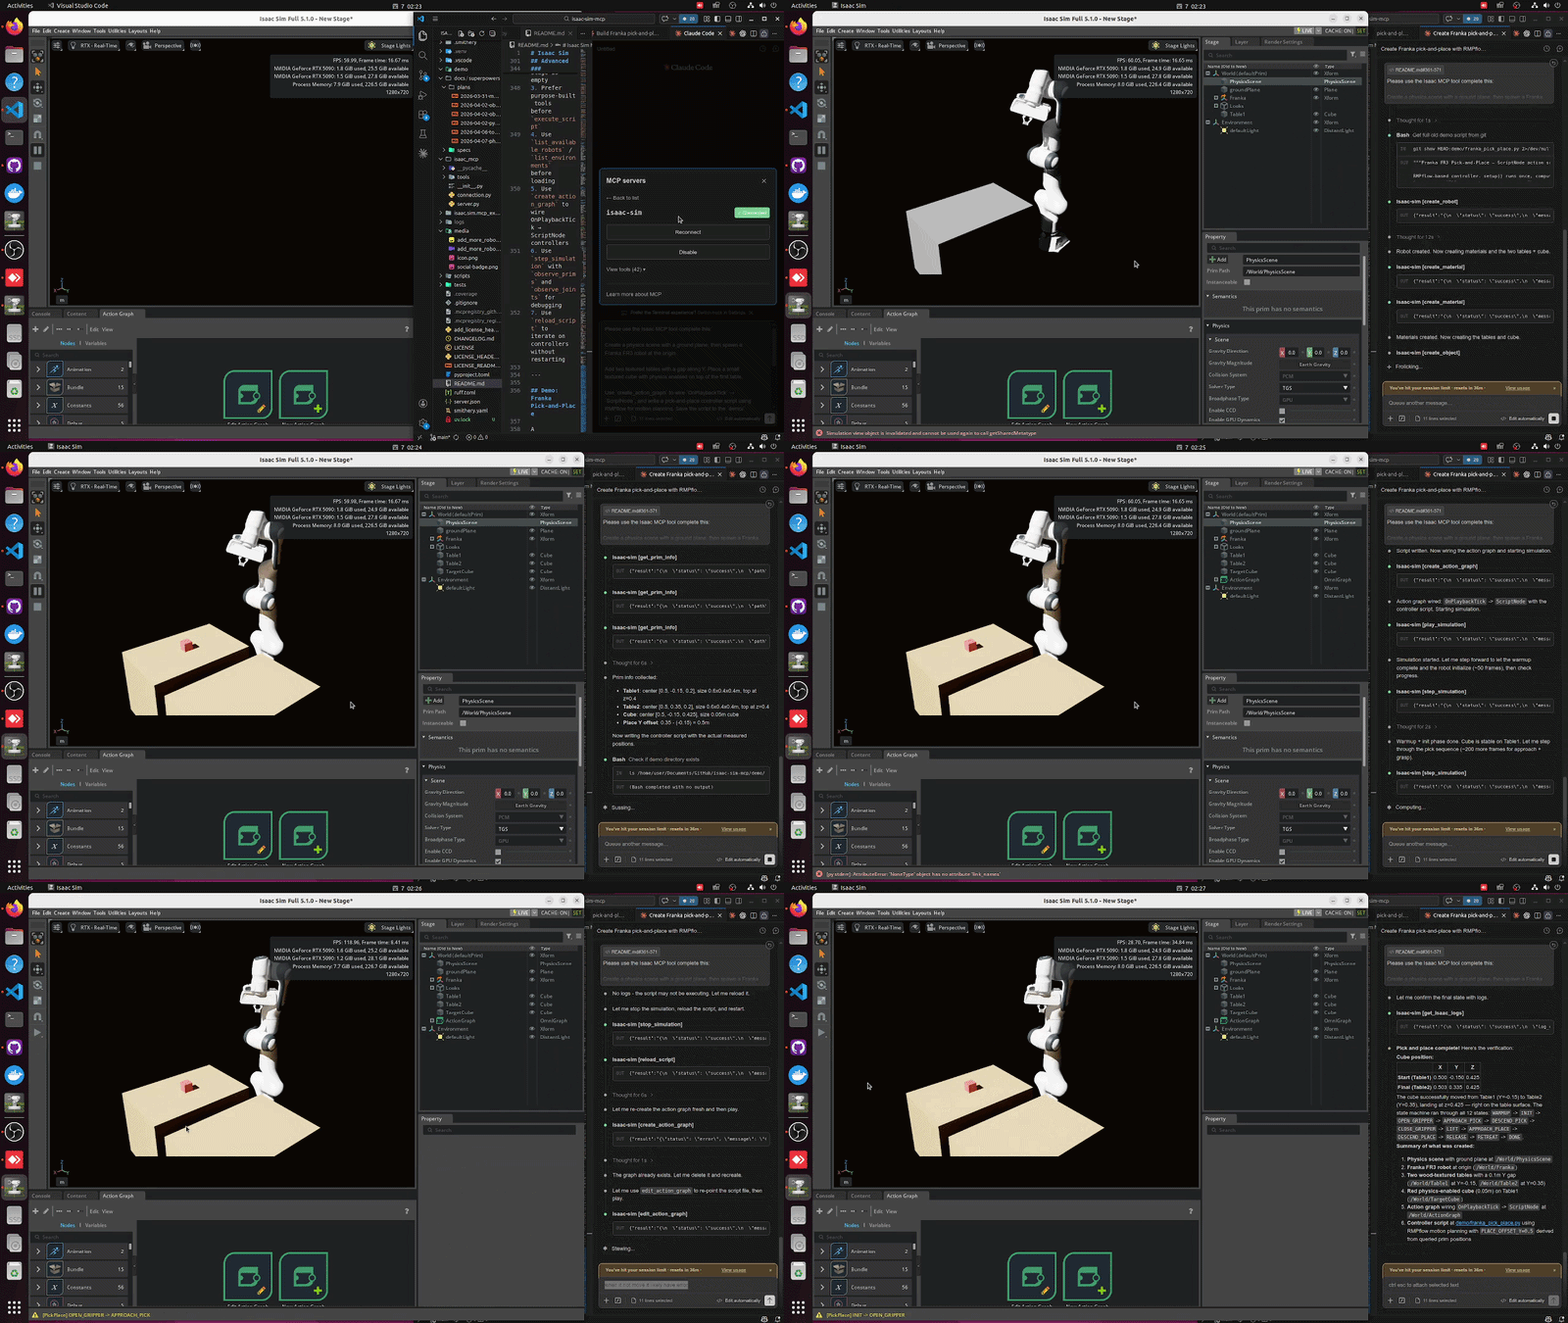\n\n---\n\n## Highlights\n\n- **42 tools** across 9 categories -- scene, objects, lighting, robots, sensors, materials, assets, simulation, graphs\n- **107+ robots** auto-discovered from the Isaac Sim asset library (Franka, UR, Unitree, Boston Dynamics, and more)\n- **Step-and-observe** debugging -- step the simulation and inspect prim positions, joint states, and physics in one call\n- **Hot-reload** -- iterate on Python controllers without restarting Isaac Sim\n- **Multi-instance** -- run multiple Isaac Sim sessions side by side on different ports\n- Built for **Isaac Sim 5.1.0 - 6.0.1** (PhysX + Newton) with a modular adapter layer for version isolation\n\n---\n\n## Installation\n\n### Option A: pip install (recommended)\n\n```bash\npip install isaacsim-mcp-server\n```\n\nThis installs the MCP server and the `isaacsim-mcp-server` CLI. You still need the Isaac Sim extension from the repo (see [Launching Isaac Sim](#2-launch-isaac-sim-with-the-extension) below).\n\n### Option B: From source\n\n```bash\ngit clone https://github.com/whats2000/isaacsim-mcp-server\ncd isaacsim-mcp-server\n./scripts/setup_python_env.sh\n```\n\n### Requirements\n\n| Requirement | Version |\n|-------------|---------|\n| NVIDIA Isaac Sim | `5.1.0` - `6.0.1` (PhysX or Newton) |\n| Python | `3.10+` |\n| `uv` | latest (for source install) |\n| Platform | Linux (Ubuntu 22.04+) or Windows 10/11 |\n\n> [!IMPORTANT]\n> **Linux** and **Windows** are supported. On Windows, use the PowerShell\n> launcher `scripts/run_isaac_sim.ps1` in place of the `.sh` scripts (see below).\n> macOS is not supported because NVIDIA Isaac Sim does not run on macOS.\n\n> [!NOTE]\n> We are welcoming contributions to support other Isaac Sim versions. \n> The adapter layer is designed for easy version isolation.\n\n---\n\n## Quick Start\n\n### 1. Set up the environment\n\nIf you installed from source:\n\n```bash\n./scripts/setup_python_env.sh\n```\n\n**On Windows**, `uv sync` creates the virtual environment (`.venv`) and installs\nthe package plus its dependencies:\n\n```powershell\nuv sync\n```\n\n### 2. Launch Isaac Sim with the extension\n\n```bash\n./scripts/run_isaac_sim.sh\n```\n\nYou should see in the logs:\n\n```\nRegistered 42 command handlers\nIsaac Sim MCP server started on localhost:8766\n```\n\nThe script looks for Isaac Sim in `$HOME/isaacsim`; set `ISAACSIM_ROOT` to use a\ndifferent install.\n\n**Choosing the physics engine.** Isaac Sim 6.0+ ships PhysX (default) and Newton\nbackends. Select one with `--newton` / `--physx`, or `ISAACSIM_ENGINE`:\n\n```bash\n./scripts/run_isaac_sim.sh # PhysX (default)\n./scripts/run_isaac_sim.sh --newton # Newton\nISAACSIM_ENGINE=newton ./scripts/run_isaac_sim.sh\n```\n\nThe same flags work with `scripts/launch_isaac_sim_mcp.sh`. Everything else on\nthe command line is forwarded to Kit untouched. The server auto-detects the\nactive engine, so no MCP-side configuration changes. Newton requires 6.0 or\nnewer; asking for it on 5.1.0 fails with a clear message.\n\n**On Windows**, use the PowerShell launcher instead. It takes the same engine\nselection and forwards extra arguments to Kit:\n\n```powershell\n.\\scripts\\run_isaac_sim.ps1 # PhysX (default)\n.\\scripts\\run_isaac_sim.ps1 -Engine newton # Newton\n$env:ISAACSIM_ENGINE = 'newton'; .\\scripts\\run_isaac_sim.ps1\n```\n\nThe script resolves the install from `-IsaacSimRoot`, then `$env:ISAACSIM_ROOT`,\nthen a local source build, then `C:\\isaacsim`, then `%USERPROFILE%\\isaacsim`. It\nalso creates a writable USD working directory (`.cache\\usd`) since Windows has no\n`/tmp`.\n\n\nOptional: Beaver3D / NVIDIA API keys for 3D generation
\n\n```bash\nexport BEAVER3D_MODEL=\"\"\nexport ARK_API_KEY=\"\"\nexport NVIDIA_API_KEY=\"\"\n```\n\nOn Windows (PowerShell):\n\n```powershell\n$env:BEAVER3D_MODEL = \"\"\n$env:ARK_API_KEY = \"\"\n$env:NVIDIA_API_KEY = \"\"\n```\n\n \n\n### 3. Connect your IDE\n\nAdd the MCP server to your editor. Replace the path with your actual repo location.\nThe `command` examples are for **Linux/macOS**; each guide shows the **Windows**\nequivalent, which wraps the PowerShell launcher `scripts\\run_mcp_server.ps1`.\n\n\nClaude Code (CLI)
\n\n```bash\nclaude mcp add isaac-sim /path/to/isaacsim-mcp-server/scripts/run_mcp_server.sh\n```\n\nOr edit `~/.claude.json` / `.mcp.json`:\n\n```json\n{\n \"mcpServers\": {\n \"isaac-sim\": {\n \"command\": \"/path/to/isaacsim-mcp-server/scripts/run_mcp_server.sh\"\n }\n }\n}\n```\n\nOn Windows, wrap the PowerShell launcher:\n\n```bash\nclaude mcp add isaac-sim -- powershell -NoProfile -ExecutionPolicy Bypass -File C:\\path\\to\\isaacsim-mcp-server\\scripts\\run_mcp_server.ps1\n```\n\n```json\n{\n \"mcpServers\": {\n \"isaac-sim\": {\n \"command\": \"powershell\",\n \"args\": [\"-NoProfile\", \"-ExecutionPolicy\", \"Bypass\", \"-File\", \"C:\\\\path\\\\to\\\\isaacsim-mcp-server\\\\scripts\\\\run_mcp_server.ps1\"]\n }\n }\n}\n```\n\n \n\n\nVS Code
\n\nCreate `.vscode/mcp.json` in your workspace:\n\n```json\n{\n \"servers\": {\n \"isaac-sim\": {\n \"command\": \"/path/to/isaacsim-mcp-server/scripts/run_mcp_server.sh\"\n }\n }\n}\n```\n\nOn Windows, wrap the PowerShell launcher:\n\n```json\n{\n \"servers\": {\n \"isaac-sim\": {\n \"command\": \"powershell\",\n \"args\": [\"-NoProfile\", \"-ExecutionPolicy\", \"Bypass\", \"-File\", \"C:\\\\path\\\\to\\\\isaacsim-mcp-server\\\\scripts\\\\run_mcp_server.ps1\"]\n }\n }\n}\n```\n\n \n\n\nCursor
\n\nOpen **Cursor Settings > MCP**, or edit `~/.cursor/mcp.json`:\n\n```json\n{\n \"mcpServers\": {\n \"isaac-sim\": {\n \"command\": \"/path/to/isaacsim-mcp-server/scripts/run_mcp_server.sh\"\n }\n }\n}\n```\n\nOn Windows, wrap the PowerShell launcher:\n\n```json\n{\n \"mcpServers\": {\n \"isaac-sim\": {\n \"command\": \"powershell\",\n \"args\": [\"-NoProfile\", \"-ExecutionPolicy\", \"Bypass\", \"-File\", \"C:\\\\path\\\\to\\\\isaacsim-mcp-server\\\\scripts\\\\run_mcp_server.ps1\"]\n }\n }\n}\n```\n\n \n\n\nClaude Desktop
\n\nEdit the config file for your platform:\n\n- macOS: `~/Library/Application Support/Claude/claude_desktop_config.json`\n- Windows: `%APPDATA%\\Claude\\claude_desktop_config.json`\n- Linux: `~/.config/Claude/claude_desktop_config.json`\n\n```json\n{\n \"mcpServers\": {\n \"isaac-sim\": {\n \"command\": \"/path/to/isaacsim-mcp-server/scripts/run_mcp_server.sh\"\n }\n }\n}\n```\n\nOn Windows, wrap the PowerShell launcher:\n\n```json\n{\n \"mcpServers\": {\n \"isaac-sim\": {\n \"command\": \"powershell\",\n \"args\": [\"-NoProfile\", \"-ExecutionPolicy\", \"Bypass\", \"-File\", \"C:\\\\path\\\\to\\\\isaacsim-mcp-server\\\\scripts\\\\run_mcp_server.ps1\"]\n }\n }\n}\n```\n\n \n\n\nWindsurf
\n\nOpen **Windsurf Settings > MCP** or edit `~/.codeium/windsurf/mcp_config.json`:\n\n```json\n{\n \"mcpServers\": {\n \"isaac-sim\": {\n \"command\": \"/path/to/isaacsim-mcp-server/scripts/run_mcp_server.sh\"\n }\n }\n}\n```\n\nOn Windows, wrap the PowerShell launcher:\n\n```json\n{\n \"mcpServers\": {\n \"isaac-sim\": {\n \"command\": \"powershell\",\n \"args\": [\"-NoProfile\", \"-ExecutionPolicy\", \"Bypass\", \"-File\", \"C:\\\\path\\\\to\\\\isaacsim-mcp-server\\\\scripts\\\\run_mcp_server.ps1\"]\n }\n }\n}\n```\n\n \n\n\nAntigravity
\n\nOpen the agent side panel, click **…** > **MCP Servers** > **Manage MCP Servers** >\n**View raw config**, or edit `~/.gemini/config/mcp_config.json` (global) or\n`.agents/mcp_config.json` (workspace):\n\n```json\n{\n \"mcpServers\": {\n \"isaac-sim\": {\n \"command\": \"/path/to/isaacsim-mcp-server/scripts/run_mcp_server.sh\"\n }\n }\n}\n```\n\nOn Windows, wrap the PowerShell launcher:\n\n```json\n{\n \"mcpServers\": {\n \"isaac-sim\": {\n \"command\": \"powershell\",\n \"args\": [\"-NoProfile\", \"-ExecutionPolicy\", \"Bypass\", \"-File\", \"C:\\\\path\\\\to\\\\isaacsim-mcp-server\\\\scripts\\\\run_mcp_server.ps1\"]\n }\n }\n}\n```\n\n \n\n\nJetBrains IDEs
\n\nGo to **Settings > Tools > AI Assistant > MCP Servers** and add the server, with\nthe command `/path/to/isaacsim-mcp-server/scripts/run_mcp_server.sh`. See the\n[JetBrains MCP docs](https://www.jetbrains.com/help/ai-assistant/configure-an-mcp-server.html) for details.\n\nOn Windows, set the command to `powershell` and the arguments to\n`-NoProfile -ExecutionPolicy Bypass -File C:\\path\\to\\isaacsim-mcp-server\\scripts\\run_mcp_server.ps1`.\n\n \n\n### 4. Start prompting\n\n```text\nCheck the connection with get_scene_info.\nIf the scene is empty, create a physics scene.\nAdd a Franka robot at the origin and a Go1 quadruped at [2, 0, 0].\n```\n\n---\n\n## Architecture\n\n```text\nMCP Client (IDE)\n |\n v\nisaacsim-mcp-server (PyPI package / CLI)\n |\n v TCP socket (localhost:8766)\n |\nisaac.sim.mcp_extension (Omniverse extension)\n |\n v\nHandlers -> Adapter -> Isaac Sim 5.1 / 6.0 APIs\n```\n\n---\n\n## Tools\n\n42 tools across 9 categories:\n\n| Category | Count | What you can do |\n|----------|------:|-----------------|\n| **Scene** | 7 | Inspect scenes, create physics, list/load environments, browse prims |\n| **Objects** | 4 | Create, delete, transform, and clone primitives |\n| **Lighting** | 2 | Create and tune lights |\n| **Robots** | 6 | Spawn 107+ robots, inspect joints, set positions, refresh library |\n| **Sensors** | 4 | Create cameras/LiDAR, capture images, get point clouds |\n| **Materials** | 2 | Create and apply materials |\n| **Assets** | 4 | Import URDF, load/search USD, generate 3D models |\n| **Graphs** | 2 | Build and edit Action Graphs (OnPlaybackTick, ScriptNode, script file attachment) |\n| **Simulation** | 11 | Play/pause/stop/step, execute Python, inspect physics, hot-reload |\n\n\nFull tool list
\n\n**Scene:** `get_scene_info` `create_physics_scene` `clear_scene` `list_prims` `get_prim_info` `list_environments` `load_environment`\n\n**Objects:** `create_object` `delete_object` `transform_object` `clone_object`\n\n**Lighting:** `create_light` `modify_light`\n\n**Robots:** `create_robot` `list_available_robots` `refresh_robot_library` `get_robot_info` `set_joint_positions` `get_joint_positions`\n\n**Sensors:** `create_camera` `capture_image` `create_lidar` `get_lidar_point_cloud`\n\n**Materials:** `create_material` `apply_material`\n\n**Assets:** `import_urdf` `load_usd` `search_usd` `generate_3d`\n\n**Graphs:** `create_action_graph` `edit_action_graph`\n\n**Simulation:** `play_simulation` `pause_simulation` `stop_simulation` `step_simulation` `set_physics_params` `get_isaac_logs` `get_simulation_state` `get_physics_state` `get_joint_config` `execute_script` `reload_script`\n\n \n\n---\n\n## Known Limitations\n\nOpen defects a normal session can hit. Each is warned about at the\npoint of use where that is possible; this list is for choosing a runtime before\nyou start.\n\n| Affects | What happens | Issue |\n|---|---|---|\n| 6.0 Newton | Joint drives do not converge — a commanded target is overshot and the joint keeps going, and joint limits are not enforced. Scene setup, stepping and inspection are fine; run motion work on PhysX (`isaac-sim.sh`). | [#21](https://github.com/whats2000/isaacsim-mcp-server/issues/21) |\n| 6.0 | The first RTX camera created in a session cannot be removed. `create_camera` warns once when it hands you that camera. | [#20](https://github.com/whats2000/isaacsim-mcp-server/issues/20) |\n| 5.1 | `get_lidar_point_cloud` fills on roughly a third of reads, so a caller must retry. A lidar created while the timeline is running never fills at all — create it stopped. | [#31](https://github.com/whats2000/isaacsim-mcp-server/issues/31) |\n| 5.1 | An RTX lidar prim cannot be deleted; the prim is left behind as a `Camera`. `create_lidar` refuses such a path and names a free one. | [#25](https://github.com/whats2000/isaacsim-mcp-server/issues/25) |\n\n---\n\n## Example Prompts\n\n**Scene bootstrap**\n```text\nCheck the connection with get_scene_info. If the scene is empty, create a physics scene.\nAdd stronger lighting and place a camera that looks at the workspace.\n```\n\n**Robot layout**\n```text\nCreate three Franka robots in a row at [0,0,0], [2,0,0], and [4,0,0].\nThen add a Go1 robot at [1, 3, 0].\n```\n\n**Environment loading**\n```text\nList available environments, choose a warehouse-like one, and load it.\nCreate a camera and capture an image.\n```\n\n**Asset search and 3D generation**\n```text\nSearch for a rusty desk, load the best result near [0, 5, 0], scaled to [2, 2, 2].\n```\n\n---\n\n## Advanced Usage\n\n### Multiple Instances\n\nRun multiple Isaac Sim sessions side by side. Each uses a different port (auto-assigned from `8766`).\n\n```bash\n# First instance (default port 8766)\nclaude mcp add isaac-sim /path/to/isaacsim-mcp-server/scripts/run_mcp_server.sh\n\n# Second instance (port 8767)\nclaude mcp add isaac-sim-2 -e ISAAC_MCP_PORT=8767 -- /path/to/isaacsim-mcp-server/scripts/run_mcp_server.sh\n```\n\n\nJSON config for multiple instances
\n\n```json\n{\n \"mcpServers\": {\n \"isaac-sim\": {\n \"command\": \"/path/to/isaacsim-mcp-server/scripts/run_mcp_server.sh\"\n },\n \"isaac-sim-2\": {\n \"command\": \"/path/to/isaacsim-mcp-server/scripts/run_mcp_server.sh\",\n \"env\": { \"ISAAC_MCP_PORT\": \"8767\" }\n }\n }\n}\n```\n\n \n\n### Desktop Launcher (Linux)\n\nInstall a dedicated **Isaac Sim MCP** application icon:\n\n```bash\n./scripts/install_desktop_entry.sh\n```\n\nThis creates a launcher that auto-assigns ports, waits for the extension socket, and cleans up on exit.\n\n### Recommended Workflow\n\n1. Start with `get_scene_info` to verify the connection\n2. Create a physics scene if the stage is empty\n3. Prefer purpose-built tools before `execute_script`\n4. Use `list_available_robots` / `list_environments` before loading\n5. Use `create_action_graph` to wire OnPlaybackTick → ScriptNode controllers\n6. Use `step_simulation` with `observe_prims` and `observe_joints` for debugging\n7. Use `reload_script` to iterate on controllers without restarting\n\n---\n\n## Demo: Franka Pick-and-Place\n\nA ready-to-run demo at `demo/franka_pick_place.py` using RMPflow for motion planning:\n\n```text\nPlease use the Isaac MCP tool complete this:\n\nCreate a physics scene with a ground plane, then spawn a Franka FR3 robot at the origin.\n\nAdd two textured tables with a gap along Y. Place a small textured cube with physics enabled on top of the first table.\n\nUse `create_action_graph` to wire `OnPlaybackTick` → `ScriptNode`, and write a pick-and-place controller script using RMPflow for motion planning. Save the script to the `demo/` directory.\n\nUse `get_prim_info` to query actual positions and sizes of the tables and cube before writing the controller — do not hardcode coordinates.\n\nStart the simulation with Play. The robot should pick the cube from table 1 and place it on table 2. Verify the process using `step_simulation` with `observe_prims` on the cube to confirm it reaches table 2.\n```\n\nUses `create_action_graph` with `script_file` for one-step Action Graph + ScriptNode setup, plus the observability tools: `get_joint_config`, `step_simulation` with `observe_prims`, `get_physics_state`, and `edit_action_graph` for script hot-reload.\n\n---\n\n## Development\n\n```bash\n# Run the MCP inspector\n./.venv/bin/python -m mcp dev ./isaac_mcp/server.py\n```\n\nThe inspector is available at `http://localhost:5173`.\n\n### Setup Notes\n\n| Script | Purpose | Default |\n|--------|---------|---------|\n| `setup_python_env.sh` | Create venv and install package | Python 3.10 |\n| `run_isaac_sim.sh` | Launch Isaac Sim with extension (Linux) | `$HOME/isaacsim` |\n| `run_isaac_sim.ps1` | Launch Isaac Sim with extension (Windows) | `C:\\isaacsim` |\n| `run_mcp_server.sh` | Start the MCP server (Linux) | Port 8766 |\n| `run_mcp_server.ps1` | Start the MCP server (Windows) | Port 8766 |\n| `launch_isaac_sim_mcp.sh` | Combined launcher | Auto-assigns port |\n| `dev_mcp_server.sh` | Dev server with hot-reload | Port 8766 |\n\nOverride defaults:\n\n```bash\nPYTHON_SPEC=3.11 ./scripts/setup_python_env.sh\nISAACSIM_ROOT=/opt/isaacsim ./scripts/run_isaac_sim.sh\nISAACSIM_ENGINE=newton ./scripts/run_isaac_sim.sh\n```\n\nEngine selection lives in `scripts/lib/isaac_launcher.sh`: each engine maps to\nthe launcher script Isaac Sim ships for it. Adding an entry to that map is all a\nnew backend needs — it enables both `ISAACSIM_ENGINE=` and `--` in\nevery launcher script.\n\n\nTroubleshooting
\n\nIf Isaac Sim says `Can't find extension with name: isaac.sim.mcp_extension`:\n\n```bash\n# Make sure you're in the repo root\npwd\ntest -f ./isaac.sim.mcp_extension/config/extension.toml && echo OK\n```\n\nNote: `--ext-folder` must point to the **repo root**, not to `isaac.sim.mcp_extension/` directly.\n\n \n\n---\n\n## Contributing\n\nPull requests are welcome. Improvements to tools, docs, adapters, and tests are all useful.\n\n## License\n\nMIT License. Copyright (c) 2023-2025 omni-mcp, Copyright (c) 2026 whats2000. See [LICENSE](LICENSE).\n",
"bytes": 18441,
"sha": "b9980acb89eb8a17bbf98b3e71e7ec596a24191e0fd0fc0998b9be9b3cbd4bf7",
"repo_slug": "whats2000/isaacsim-mcp-server",
"fonte": "repo",
"truncated": false,
"api": "https://agentalog.com/api/listings/mcp_io_github_whats2000_isaacsim_mcp_server_7ebb4991/readme"
}